

Installation
How to Fit a Flange on a Hot Water Cylinder
The key to ensuring a successful installation relies on the understanding that every component within a plumbing system plays a critical role. One of the most important in a shower pump installation, but often overlooked components, is the flange.
To achieve peak performance from a shower pump, for instance, plumbers cannot afford to neglect any critical step in the installation process as this may lead to diminished efficiency, possible damage, and dissatisfaction among their own customers.
Although a small device, a flange plays a significant role in ensuring longevity of life and quiet running of a pump in the home.
To better understand the purpose and advantages of using these essential devices, Mike Oxley our very own Training Manager, offers valuable insight into the benefits of plumbers utilising flanges in a shower pump installation.
What is a Cylinder Flange?
A flange is an ‘anti-aeration device’, which will limit the amount of air entering a pump from the hot water cylinder.
When water is heated, or replaced within the hot water cylinder, air bubbles can form and collect around the side or the top of the cylinder. The bubbles then rise to the top and out of the vent and expansion pipe.
This creates an aerated supply of water to the pump, showers and other outlets in the system, which can lead to a multitude of risks, including unnecessary temperature fluctuations, noisy operation of the pump, the accelerated deterioration of the pumps’ internal components, leading to the possibility of leaks, and premature pump breakdown.
By installing an anti-aeration flange, these air bubbles are prevented from entering the pump, which prevents cavitation and ensures the longevity of life and quiet running of the pump.
Not only do they protect the lifespan of a gravity fed pump, but in the case of centrifugal pumps, they also make the warranty valid and prevent damage to the impellors.
What is the Difference Between a Surrey Flange, Warix Flange, and an Essex flange?
There are a range of flanges available, but the location of the pump, and the distance between the cold-water storage tank, will determine which flange is needed.
A top entry flange, such as a Salamander Pumps’ S-flange, or a Warix flange, can be used if there is at least 1m between the base of the cold-water tank and the top of the hot water cylinder.
As the air gathers at the top of the cylinder, the design of the flange allows air to rise through and up through the vent/ expansion pipe. Air free water is taken from deeper within the hot water cylinder via a dip tube, to provide the pump with an air free supply.
The Difference Between the Flanges: S-Flange, No-Stop Essex Flange, and Warix Flange
Whilst similar in appearance, it is important to note that the S-flange and Warix flange have subtle differences. On the S-flange, the 22mm side connection feeds the pump and the top connection (22mm or 28mm) connects to the open vent pipe. The Warix flange connections are reversed, so it is important to ensure plumbers are aware of this to ensure the connections are correct.
A side entry flange, such as a No stop Essex flange, is required in two circumstances.
- The pump is installed above the hot water cylinder, alongside an anti-gravity loop of 400mm.
- Where there is less than 1m between the top of the hot water cylinder and base of the cold water cistern.
Outside of these circumstances a top entry flange can be used.
Once you’ve confirmed what flange you need, it’s vital that it’s installed correctly to ensure optimal performance and longevity.
How to Install a Flange. A Step-by-Step Guide.
Here Mike explains how to install the Salamander Pumps’ S-flange as part of a shower pump installation.
Step 1. Turn off the water.
Turn off the water supply to the hot water cylinder and prepare the surrounding areas ready to install the flange.
Step 2. Open the hot water taps and run until the flow stops.
The hot water cylinder is now empty and you’re ready to begin your installation.
Step 3. Unscrew and remove any existing compression fitting from the top of the tank and clean the pipes.
It’s important to note that this might lead to some residual water drainage – so be prepared with appropriate measures. Carefully remove any existing compression fitting from the top of the hot water cylinder.
Clean the area to remove any debris or remnants from the previous connection.
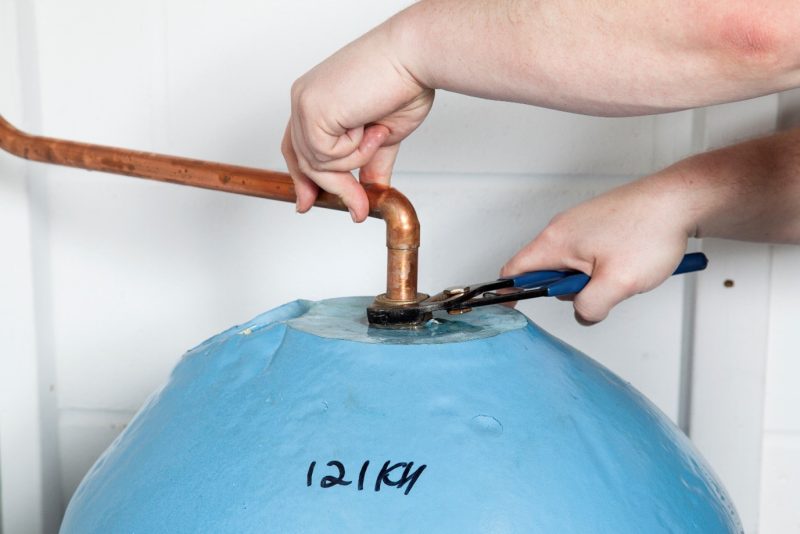
Step 4. Cut any pipes back to allow the S-flange to be installed.
Use a pipe-cutter to trim the existing pipes to allow the flange to be fitted to the top of the hot water cylinder.
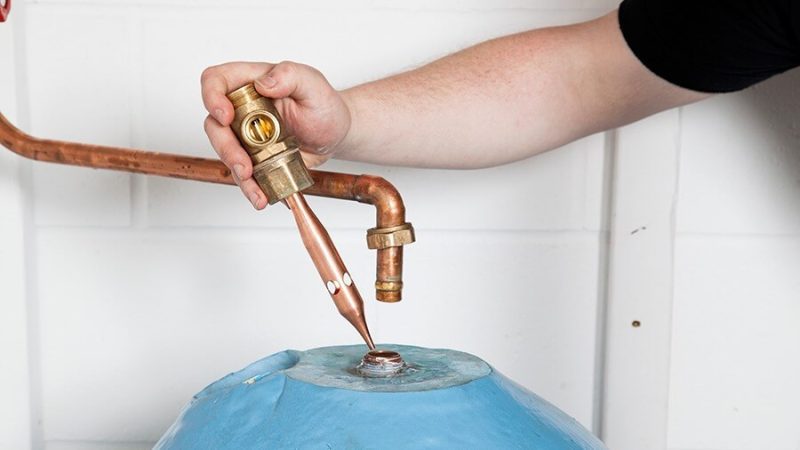
Step 5. Install the flange.
Wrap PTFE or potable jointing compound around the cleaned male threads of the S Flange. It’s important to note that when wrapping PTFE tape around a thread each revolution or layer should overlap the last one by roughly a half to ensure a good seal. PTFE tape should always run in the same direction as the thread itself.
Tighten the flange onto the hot water tank to ensure a watertight seal and carefully screw it into the hot water cylinder ensuring it is level.
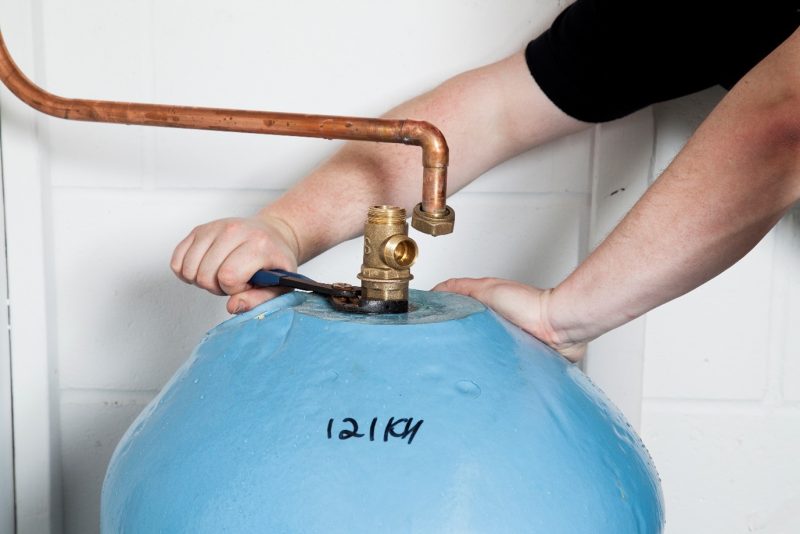
Step 6. Create the hot water supply to the pump.
Remember that pipework to the open vent is taken via the 22/28mm connection on the top of the flange. The 22mm side connection supplies the unaerated hot water supply to the pump.
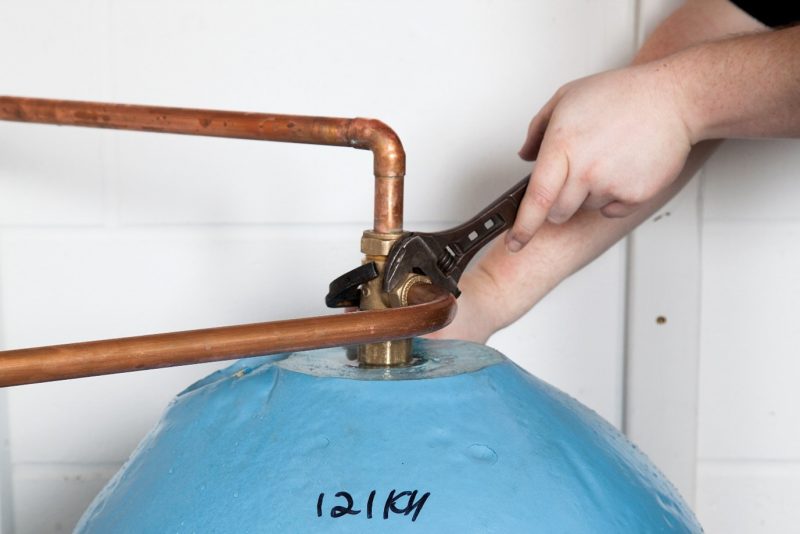
Step 7. Check all the fittings.
It might sound obvious, but it’s always best to double check all the fittings are watertight and that the shower pump is fully installed before turning the water back on and checking for leaks.
Step 8. Testing for leaks.
The moment of truth, turn on the water supply and open the feed to fill the hot water cylinder so that you can test for leaks. If there’s no leakage, then it’s a job well done.
The need for a flange can often be overlooked, but it is important for protecting a shower pump from damage caused by air and ensuring its longevity. So, if you’re concerned about aerated water damaging the pump, then a flange should be your first choice.